The Art of Gluing Things Together
There are a lot of tutorials out there about how to make flashy features for a game like a crafting system or a grappling hook, but very few about how to take all these disparate pieces make a whole game work. In this post I wanted to talk about what I affectionately refer to as “Glue Code” these are things that manage your gameplay flow, let systems talk to one another, and just generally allow you to make a real game instead of just a youtube-friendly tech demo.
I want to preface all of this by first saying that the structure of a game that feels right is inextricably tied to your own personal aesthetic. One programmers spaghetti code can be another’s simple and effective depending on their background and what kind of problems they’ve encountered in the past. For this reason I’m not going to be too prescriptive here. I’m just going to lay out various patterns and talk a bit about how and when they’re useful. I’m also going to try to keep this as engine-agnostic as I can, but I will provide some examples in Unreal and Unity.
With all that out of the way, let’s start moving through various patterns from least to most complex!
Singleton Game Manager
A Game Manager is simply a top-level object that controls the overall flow of your game. They will almost always be a Singleton meaning that they will have one instance that is globally accessible.
They may spawn initial actors for a level, emit events for other actors, or manage a global state machine if your gameplay is structured into distinct phases.
Game Managers can go by many names like Game Controller, Root State, or even just Game (As is the case in this famously silly example from the source code for VVVVVV). Oftentimes programmers will naturally stumble onto this pattern making their first game, something needs to be in charge of how the game works after all.
If your game is small/simple enough, this structure alone can often take from prototyping to ship without much issue. I want to emphasize that last part again, this is a perfectly fine way to make a game and if it’s working for your project, keep on rockin it!
It’s not however without pitfalls, those usually being:
- The file for this class becoming so large that it becomes harder and hard to reason about as your project grows in scale.
- It will naturally create a lot of coupling which will make it hard to re-use or adapt systems to different parts of your game.
- It can often become a dumping ground for things that don’t fit exactly in other places in the codebase. Whenever you can put something in any place other than the game manager, you should put it in that other place (or make a place for it to go).
- It’s a singleton and thus carries all of the issues a singleton has (Always)
Creating a Game Manager
In Unity:
Attach a C# script on a game object with references to all the things it needs to touch that is created on load and never destroyed.
This should give you a pretty good starting point:
public class GameManager : MonoBehaviour
{
    public static GameManager Instance { get; private set; }
    private void Awake()
    {
      if(Instance == null){
        Instance = this;
        // If you want a global game manager that exists across all scenes
        DontDestroyOnLoad(this.gameObject);
      }
      else{
        Destroy(this.gameObject)
      }
    }
    public void TriggerThing(){};
}
// ...
// To Access it:
GameManager.Instance.TriggerThing();
You will then need to make sure this game object exists in either your boot scene or (ideally) all the primary scenes in your game.
In Unreal:
First, try to leverage the built-in GameMode & GameState classes instead of you own implementation since it works better with the rest of the Unreal ecosystem.
I like to think of the Game Mode as my rules engine that responds to events and updates the GameState which is read by the relevant entities in the game world. As a big plus, you can wire game mode logic in blueprint so it’s more accessible to your team members that don’t know C++ to understand what’s going on with the game!
If you really want/need to roll your own thing, you can make a custom Game Manager Subsystem. In general Subsystems are extremely useful for singleton-like things in Unreal (See: Implementing a Service for more detail on why). Keep in mind, if you go down this route you will have more trouble implementing multiplayer as GameMode and GameState do a lot for you in terms of server authority and replication.
Services
As your game manager grows in scope, you will eventually feel a need to start splitting off functionality into more standalone pieces. This is where Services come in. Services are (usually singleton) classes that are available to any part of the codebase to perform a service of some kind. That may sound like an overly broad definition but it’s because services are meant to cover a wide range of capabilities, doing everything from playing sound effects to coordinating AI behavior.
A lot of mature codebases rely on this pattern because it’s an easy way to segment different systems and allow them to be created, worked on, and tested in isolation from one another when you have a large and specialized team. For instance you can have Audio Engineers owning services that control music and sound effects, Tech Artists owning Services that spawn particle effects, and Gameplay Programmers owning Services relevant to specific features they’re working on.
My rules of thumb for creating services are:
- Think about if this service really needs to exist
- Is there only 1 place it’s being used?
- Could this be better served as a static function utility?
- Is there an existing service you could modify to fit your use-case?
- Does this need to be accessible everywhere?
- Think carefully about how the service is going to be used and what kind of interface would be most convenient/performant for those use-cases
- Generally a service should do a few things, but do them well
- Follow existing conventions in your codebase (unless you find a very good reason not to)
- Try to avoid referencing services from other services
- Avoid this at all costs during initialization
- If you do this, make sure to avoid cyclic references (Service A uses Service B and Service B uses Service A)
- Document your interface for the service as well as expected usage with good comments.
Services are a powerful tool and with great power comes great responsibility (to avoid spaghetti-fying yor codebase).
Implementing a Service
Regardless of your chosen tool, services are usually built with static singletons, dependency injection, or a service locator. This section will assume you are starting with a singleton (we’ll explore the other solutions for wiring in the next section)
In Unity:
You can use a similar setup to your game manager singleton as outlined in the previous section.
In Unreal:
Custom Subsystems are a great fit for singleton services. They are tied to specific lifetimes (World, Level, Player, Game Instance) based on their parent class and Unreal will automatically instantiate and destroy them for you.
UCLASS()
class YOURGAME_API UMyService : public UGameInstanceSubsystem
{
    GENERATED_BODY()

public:
    // Do your setup and initialization here
    virtual void Initialize(FSubsystemCollectionBase& Collection) override;
    // Handle any cleanup here
    virtual void Deinitialize() override;

    UFUNCTION(BlueprintCallable)
    void DoThing();
};
// ...
UMyService* serviceRef = GetGameInstance()->GetSubsystem<UMyService>();
if(serviceRef){
  serviceRef->DoThing();
}
Service Subsystems are also automatically exposed to Blueprints so you can also make them available for designers & artists!
I would caution before you start rolling a service for something, peruse the Official Unreal Documentation to make sure it doesn’t already exist. Unreal is the most mature widely-used game engine for a reason and it’s better to lean on existing systems/plugins that.
I would STRONGLY RECOMMEND AGAINST rolling a custom C++ singleton for many reasons, chief among them being that they will be a huge hassle to keep in sync with the engine’s lifecycle. For more detail see this excellent write-up from benui
Dependency Injection & Service Locators
As your project gets larger and the number of services grows, it can become difficult to connect dependencies to one another in a sane way. There are two common solutions to this problem that I’ll explore here.
Service Locators
Service Locators exist as a middle ground between static singletons and a big DI framework and that is the trusty Service Locator. A Service Locator is a global singleton that wires up services and then allows other parts of your codebase to access those services via their interface. This is often what people want when they reach for dependency injection and it’s what I recommend instead.
Implementing a Service Locator
Unlike Dependency Injection, a basic service locator is usually dead-simple to implement and then expand as your needs change.
In Unity:
You can leverage a static class that wires up concrete service implementations with interfaces accessed by other parts of your code-base like so:
public static class ServiceLocator
{
    private static readonly Dictionary<Type, object> services = new Dictionary<Type, object>();

    public static void RegisterService<T>(T service)
    {
        var type = typeof(T);
        if (!services.ContainsKey(type))
        {
            services[type] = service;
        }
    }

    public static T GetService<T>()
    {
        var type = typeof(T);
        if (services.ContainsKey(type))
        {
            return (T)services[type];
        }
        else
        {
            throw new Exception($"Service of type {type} not found.");
        }
    }
}
Then use your game manager or other singleton to wire things up in it’s Awake() method:
public class GameManager : MonoBehaviour
{
    // This makes sure this is run before any other game object behaviors
    [RuntimeInitializeOnLoadMethod(RuntimeInitializeLoadType.BeforeSplashScreen )]
    void RegisterServices()
    {
        // Register the audio service
        ServiceLocator.RegisterService<IAudioService>(new AudioService());
    }
}
Then access it from wherever you need:
public class Player : MonoBehaviour
{
    void Update()
    {
        if (Input.GetKeyDown(KeyCode.Space))
        {
            var audioService = ServiceLocator.GetService<IAudioService>();
            audioService.PlaySound("Jump");
        }
    }
}
In Unreal:
Once again subsystems are a natural fit for a singleton service locator and implementing one is fairly straightforward:
UCLASS()
class YOURGAME_API UServiceLocator : public UGameInstanceSubsystem
{
	GENERATED_BODY()

public:
    // Register a service
    UFUNCTION(BlueprintCallable)
    void RegisterService(TSubclassOf<UObject> ServiceClass, UObject* Service)
    {
        Services.Add(ServiceClass, Service);
    }

    // Retrieve a service
    UFUNCTION(BlueprintCallable)
    UObject* GetService(TSubclassOf<UObject> ServiceClass)
    {
        UObject** Found = Services.Find(ServiceClass);
        return Found ? *Found : nullptr;
    }

private:
    UPROPERTY()
    TMap<TSubclassOf<UObject>, UObject*> Services;
};
Then you can register a service anywhere (But it’s usually most convenient to do it in GameInstance because it’s initialized very early the Unreal lifecycle)
void UMyGameInstance::Init()
{
    Super::Init();

    UServiceLocator* Locator = GetSubsystem<UServiceLocator>();
    if (Locator)
    {
        UMyService* MyService = NewObject<UMyService>(this);
        Locator->RegisterService(UMyService::StaticClass(), MyService);
    }
}
Finally, you can access the service anywhere via the locator:
UServiceLocator* Locator = GetGameInstance()->GetSubsystem<UServiceLocator>();
if (Locator)
{
    UMyService* MyService = Cast<UMyService>(Locator->GetService(UMyService::StaticClass()));
    if (MyService)
    {
        MyService->DoThing();
    }
}
Dependency Injection
Dependency Injection frameworks work by building out a graph of all your dependencies and automatically injecting references to them into each object. Usually you will have one or more Containers that manage the scope of different dependencies (like for instance global vs. scene) and provide a way to have multiple instances of dependencies. You can even use fancy techniques to inject different things in different situations.
Dependency Injection is very common in the world of web development, but not so much in most game projects, likely because game developers usually prefer control over abstraction and DI is a very heavy abstraction.
It’s important to note that while DI can help with a lot of your dependency wiring, it’s not a silver bullet, and you can still end up in situations where you have to spend a lot of time untangling dependencies that have circular references.
DI also can’t really solve a mess of dependencies all it really does is hide the mess so you don’t have to see it as often. The rabbit hole can go very deep with DI frameworks and their is a risk that engineers can turn them into code-golf challenges that make things even harder to understand. Which is why I recommend trying to use them sparingly.
Overall, I find a full dependency injection system tough to recommend for all but the most complex projects as it’s usually solving a lot more problems than most people have in their games as well as adding more complexity. Still, every tool has it’s use and there are many projects (Like Pokemon Go) that use it effectively.
Integrating Dependency Injection
I would not recommend rolling your own solution for Dependency Injection if possible as they can be a huge time-sink for engineers, so instead I will link to projects that already exist that you can utilize.
In Unity:
Zenject is the solution I’ve worked with the most as it’s the foundation of Pokemon Go’s codebase, though it’s not as well-supported as it used to be and is a bit on the heavy-side in terms of complexity. VContainer is another option that seems to be popular.
In Unreal:
Unreal has Type Containers which provide a simple DI solution. it’s important to note that they are C++ only so your designers wont easily be able to access them in blueprint land. They also aren’t used by a lot of games and the only place Epic uses them is in the Unreal Launcher so YMMV.
Eric Friedman has a stellar write-up on all the different ways Type Containers can be used.
Global Events / Pub-Sub
Event systems are another common tool to reach for as the size of your game grows. Events are pretty simple at their core, an object in your game generates an event of a certain type (optionally with some data), and other objects listen for those those events and respond accordingly.
A good example of where an event might be useful in a game is defeating a boss. After the player fells the boss, you probably want to:
- Trigger an auto save
- Play a victory sound
- Start a cut-scene
- Record EXP
- Unlock an achievement Since these are all disparate systems, dispatching a global event is much simpler and more flexible than trying to call all these methods directly.
I like to reserve events for cases where I have 2 or more mostly unconnected systems/objects that need to talk to one another for a few specific cases. That said, if you already have a reference to something, method calls are preferable since they are cheaper and easier to trace. It also goes without saying that you should avoid situations where you are generating events every tick, as this can add large overheads to the performance of your game. Events are also tricky to reason about as they (by-design) decouple the parts of your gameplay code, which is another good reason not to over-use them.
Pub-Sub
Publish & Subscribe systems take the concept of events and make it a bit more granular. Instead of all events going out globally, you can make dedicated streams for events to fall into. This can make your event system much easier to reason about, but also less flexible overall.
Creating an event system
In Unity:
Actions in C# give us everything we need for a flexible event system:
public static class EventManager
{
    // Dictionary to hold event type and corresponding delegates
    private static Dictionary<Type, Delegate> eventTable = new Dictionary<Type, Delegate>();

    // Subscribe to an event
    public static void Subscribe<T>(Action<T> listener)
    {
        Type eventType = typeof(T);
        if (eventTable.TryGetValue(eventType, out var existingDelegate))
        {
            eventTable[eventType] = Delegate.Combine(existingDelegate, listener);
        }
        else
        {
            eventTable[eventType] = listener;
        }
    }

    // Unsubscribe from an event
    public static void Unsubscribe<T>(Action<T> listener)
    {
        Type eventType = typeof(T);
        if (eventTable.TryGetValue(eventType, out var existingDelegate))
        {
            var newDelegate = Delegate.Remove(existingDelegate, listener);
            if (newDelegate == null)
            {
                eventTable.Remove(eventType);
            }
            else
            {
                eventTable[eventType] = newDelegate;
            }
        }
    }

    // Publish an event
    public static void Publish<T>(T eventData)
    {
        Type eventType = typeof(T);
        if (eventTable.TryGetValue(eventType, out var existingDelegate))
        {
            var callback = existingDelegate as Action<T>;
            callback?.Invoke(eventData);
        }
    }
}
// ...

// How to subscribe:
EventManager.Subscribe<GameStartEvent>(OnGameStart);

// How to publish an event:
EventManager.Publish(new GameStartEvent());
If you want to make a more designer-friendly version of an event system, I would recommend looking at the approach Schell Games outlines in this talk.
In Unreal:
Unreal provides a very natural way to build events via delegates, we just have to make it available globally via a subsystem:
DECLARE_DYNAMIC_MULTICAST_DELEGATE_TwoParams(FEventDelegate, FName, EventName, UObject*, EventData);

UCLASS()
class YOURGAME_API UEventManagerSubsystem : public UGameInstanceSubsystem
{
    GENERATED_BODY()

public:
    // Dispatch an event with associated data
    UFUNCTION(BlueprintCallable)
    void DispatchEvent(FName EventName, UObject* EventData)
    {
        if (FEventDelegate* Delegate = EventDelegates.Find(EventName))
        {
            Delegate->Broadcast(EventName, EventData);
        }
    }

    // Subscribe to an event
    UFUNCTION(BlueprintCallable)
    void SubscribeEvent(FName EventName, const FEventDelegate& EventDelegate)
    {
        FEventDelegate& Delegate = EventDelegates.FindOrAdd(EventName);
        Delegate.Add(EventDelegate);
    }


    // Unsubscribe from an event
    UFUNCTION(BlueprintCallable)
    void UnsubscribeEvent(FName EventName, const FEventDelegate& EventDelegate)
    {
        if (FEventDelegate* Delegate = EventDelegates.Find(EventName))
        {
            Delegate->Remove(EventDelegate);
        }
    }

private:
    // Map of event names to their corresponding delegates
    UPROPERTY()
    TMap<FName, FEventDelegate> EventDelegates;
};
// ...

// How to subscribe:
FEventDelegate Delegate;
Delegate.AddDynamic(this, &UYourClass::OnGameStart);
EventManager->SubscribeEvent("GameStart", Delegate);

// How to publish an event:
EventManager->DispatchEvent("GameStarted", NewObject<UGameStartedEvent>());
Observers
The Observer pattern is kind of ironically named because in most implementations an observer is not actively watching what is being observed, but is being pinged when it updates. When your level starts, observers will subscribe to the observable values that are relevant to them, then when the owner of that value changes it, it will go through each active subscriber and notify them that the value has changed. Values can be simple values like ints, bools, or floats or they can be larger objects like the entire game state.
Observers are good to use when you have a value that rarely updates and affects multiple things. UI elements like a health-bar work really well because it only changes when the player is hurt or heals and as a bonus, you can easily wire in visual effects that accentuate the change. This is also a much better alternative performance-wise to checking for updates every frame.
In general, you should try to be as granular as possible in terms of what data is being observed to avoid notifying too many things at once. That being said, you can reach a point where you have so many little bits of data that it becomes hard to reason about. I usually recommend grouping things together that make sense logically, and then breaking them out later as you start to have performance issues.
Implementing an Observer system
In Unity:
Actions are once again the tool to each for in Unity, allowing us to easily notify subscribers for any property:
public class ObservableProperty<T>
{
    private T _value;

    public event Action<T> OnValueChanged;

    public ObservableProperty(T initialValue = default)
    {
        _value = initialValue;
    }

    public T Value
    {
        get => _value;
        set
        {
            if (!Equals(_value, value))
            {
                _value = value;
                OnValueChanged?.Invoke(_value);
            }
        }
    }
}
// ...
// Setting up the observable:
public ObservableProperty<int> Health = new ObservableProperty<int>(100);
// Subscribing to updates:
Health.OnValueChanged += OnHealthChanged
Once again, I would also recommend considering the Scriptable-Objects-Based method Schell Games developed for their games. They are easy to use and allow you to re-use and test different components in isolation.
In Unreal:
A Delegate with a single argument can act as an observable, you just have to remember to update it when you update the value tied to it:
DECLARE_DYNAMIC_MULTICAST_DELEGATE_OneParam(FOnValueChanged, int32, NewValue);

class YOURGAME_API UMyObservableComponent : public UActorComponent
{
    GENERATED_BODY()

public:
    // The delegate that observers can bind to
    UPROPERTY(BlueprintAssignable, Category="Events")
    FOnValueChanged OnValueChanged;

    // Function to change the value and notify observers
    UFUNCTION(BlueprintCallable, Category="Observable")
    void SetValue(int32 NewValue)
    {
      if (CurrentValue != NewValue)
      {
          CurrentValue = NewValue;
          OnValueChanged.Broadcast(CurrentValue);
      }
    }

private:
    int32 CurrentValue;
};
// ...
// Subscribing to updates:
ObservableComponent->OnValueChanged.AddDynamic(this, &AMyObserverActor::HandleValueChanged);
States
States are your go-to tool when you need to logically separate different parts of gameplay or behavior. To understand states it’s useful to think about 2 different examples of state at different scales.
State Machines
State machines are a pattern where you have an active state, a set of possible states, and transitions between them.
The classical definition of a state machine requires changes happen only through codified Transitions (usually enums), but I usually prefer the flexibility for transitions to happen from any node to any other node (at least when working with gameplay logic).
At the small scale
Characters can get pretty complicated over time, and once you start to have multiple sets of logic (or even logic you want to re-use with other characters) it can be tough to keep it all organized.
Imagine you are creating an enemy in a platformer that runs at the player when they are close, but otherwise patrols. You would define 2 states: Patrol and Chase.
Patrol would follow a pre-defined path and if the player is in range transition to Chase. Chase would move towards the player and if the player moves out of range transition to Patrol.
This is a pretty simple example, but it leads to behavior that is much easier to reason about and extend than a giant if-else statement.
Implementing a Small-Scale State Machine
In Unity:
First we start with our state class:
public interface ICharacterState
{
    void Enter(GameObject owner);
    void Exit(GameObject owner);
    void Update(GameObject owner, float deltaTime);
}

public class IdleState : ICharacterState
{
    public void Enter(GameObject owner){ /*Do stuff*/ }
    public void Exit(GameObject owner){ /*Do stuff*/ }
    public void Update(GameObject owner, float deltaTime){ /*Do stuff*/ }
}
// ChaseState
// PatrolState
Then build a component to manage the state
[Serializable]
public class StateDefinition
{
    public string StateKey;
    public Type StateType;
}

public class StateMachine : MonoBehaviour
{
    [SerializeField]
    private string initialStateKey;

    [SerializeField]
    private List<StateDefinition> stateDefinitions;

    private Dictionary<string, ICharacterState> stateMap = new Dictionary<string, ICharacterState>();
    private ICharacterState currentState;

    private void Awake()
    {
        foreach (var stateDef in stateDefinitions)
        {
            if (stateDef.StateType != null)
            {
                ICharacterState stateInstance = (ICharacterState)Activator.CreateInstance(stateDef.StateType);
                stateMap.Add(stateDef.StateKey, stateInstance);
            }
        }
    }

    private void Start()
    {
        if (stateMap.TryGetValue(initialStateKey, out var initialState))
        {
            currentState = initialState;
            currentState.Enter(gameObject);
        }
    }

    private void Update()
    {
        currentState?.Update(gameObject, Time.deltaTime);
    }

    public void SwitchState(string stateKey)
    {
        if (stateMap.TryGetValue(stateKey, out var newState))
        {
            if (newState == currentState)
                return;

            currentState?.Exit(gameObject);
            currentState = newState;
            currentState.Enter(gameObject);
        }
    }
}
And finally we can attach this component to a game object and use it like so
if(EnemyNearby)
{
    MyStateMachine.SwitchState("Chase");
}
else if(Alerted)
{
    MyStateMachine.SwitchState("Patrol");
}
else
{
    MyStateMachine.SwitchState("Idle");
}
In Unreal:
First off we need to define our individual state objects:
UINTERFACE(MinimalAPI, Blueprintable)
class UCharacterStateInterface : public UInterface
{
    GENERATED_BODY()
};

class ICharacterStateInterface
{
    GENERATED_BODY()
public:
    virtual void Enter(AActor* Owner);
    virtual void Exit(AActor* Owner);
    virtual void Update(AActor* Owner, float DeltaTime);
};

UCLASS(Blueprintable)
class UIdleState : public UObject, public ICharacterStateInterface
{
    GENERATED_BODY()
public:
    virtual void Enter(AActor* Owner) { /*Do stuff*/ }
    virtual void Exit(AActor* Owner) { /*Do stuff*/ }
    virtual void Update(AActor* Owner, float DeltaTime) { /*Do stuff*/ }
};
// UChaseState
// UPatrolState
Then we need to wrap them all up in a state machine:
UCLASS()
class UStateManagerComponent : public UActorComponent
{
	GENERATED_BODY()
public:
	// Sets default values for this component's properties
	UStateManagerComponent();

    UPROPERTY(BlueprintReadOnly, EditDefaultsOnly)
	FString InitialState;

	UPROPERTY(BlueprintReadOnly, EditDefaultsOnly)
	TMap<FString, TSubclassOf<UStateBase>> AvailableStates;

    UPROPERTY(BlueprintReadOnly)
	UStateBase* CurrentState = nullptr;

    UFUNCTION(BlueprintCallable)
	void SwitchStateByKey(FString StateKey)
    {
        UStateBase* NewState = StateMap.FindRef(StateKey);
        if(!NewState || NewState == CurrentState){
            return;
        }
        if(CurrentState)
        {
            CurrentState->OnExit(GetOwner())
        }
        CurrentState = NewState;
        CurrentState->OnEnter(GetOwner)
    }

protected:
	virtual void BeginPlay() override
    {
        Super::BeginPlay();
        for (const auto& StateDef : StateDefinitions.Items)
        {
            UCharacterStateInterface* State = NewObject<UCharacterStateInterface>(this, StateDef->Value);
            StateMap.Add(StateDef->Key, State);
        }
    }

	virtual void TickComponent(float DeltaTime, ELevelTick TickType, FActorComponentTickFunction* ThisTickFunction) override
    {
        if(CurrentState){
            CurrentState->Update(GetOwner, DeltaTime);
        }
    }
private:
	UPROPERTY()
	TMap<FString, UStateBase*> StateMap;
};
And now we can slap this component on any actor we want to run states on, pretty neat!
if(EnemyNearby)
{
    MyStateMachine->SwitchStateByKey("Chase");
}
else if(Alerted)
{
    MyStateMachine->SwitchStateByKey("Patrol");
}
else
{
    MyStateMachine->SwitchStateByKey("Idle");
}
At a larger scale
When you’re working at a small scale, it’s very easy to cleanly encapsulate the behavior in a few scripts, but what if we had not only states for characters, but for our game as a whole?
It turns out they’re very useful for high level gameplay flow where you have a lot of systems that need to be coordinated.
For example, in my game ArrowBall I set up a state machine to control a round of play with the following States:
- GameStart
- CountDown
- ActiveRound
- Score
- Celebration
- GameEnd
I don’t opt for strict transitions for the sake of flexibility, but it ends up looking something like this:
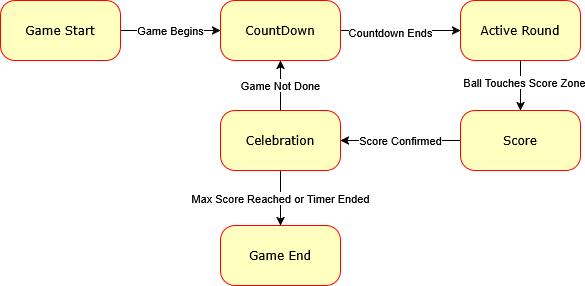
The real magic starts when you realize can hook a state machine up to your events system to broadcast events when you enter and exit certain states. Doing this allows you to trigger animations, particle effects, sounds, UI, or whatever else you need in a way that’s flexible and extensible.
For instance in ArrowBall when the Score state is entered it triggers:
- A horn sound
- The ball to explode into confetti
- The score UI to slide in
- The game manager incrementing the score on the game state then changing the state machine to
Celebration
Lots of different systems, all working in harmony, it doesn’t get any better than that!
Implementing a large-scale State Machine
In Unity:
IN PROGRESS
In Unreal:
IN PROGRESS
State Stacks
Flat State machines and States work really well when states are used in a predictable way, but it becomes difficult to manage when you have a state that you want to re-use in multiple contexts like one that manages a menu or a confirm dialog. State Stacks to the rescue!
A State Stack is simply an organization of different states onto a stack with only the top-most state being active. This means you can pop into a new state and once that state is done, you can just pop it and return to the previous state.
The clearest example of where this is useful is in UI Menus. Games often have dozens if not hundreds of menus and they’re often used in different contexts. For instance you might have an options menu that is accessed from both the title screen, as well as in-game from the pause menu. With a State Stack you just push the Options Menu State onto the stack when a button is pressed, and then when “back” is pressed you pop it off and return to either the title screen or pause menu. If you have controller bindings or a back button like Android this makes your life even easier since you can just map that button to pop the top-most State in the stack without having to explicitly code out the behavior for each State.
Implementing a State Stack
In Unity:
First things first, we have to define our state interface and some states:
public interface IState
{
    void OnEnter();
    void OnExit();
    void OnUpdate();
}

public class MainMenuState : IState
{
    public void OnEnter() { Debug.Log("Entered Main Menu"); }
    public void OnExit() { Debug.Log("Exited Main Menu"); }
    public void OnUpdate() { /* Handle Main Menu logic */ }
}

public class GameplayState : IState
{
    public void OnEnter() { Debug.Log("Game Started"); }
    public void OnExit() { Debug.Log("Game Over"); }
    public void OnUpdate() { /* Handle Gameplay logic */ }
}
Then a manager to hold our state stack:
public class StateStackManager
{
    private Stack<IState> stateStack = new Stack<IState>();

    public void PushState(IState newState)
    {
        if (stateStack.Count > 0)
            stateStack.Peek().OnExit();

        stateStack.Push(newState);
        newState.OnEnter();
    }

    public void PopState()
    {
        if (stateStack.Count == 0) return;

        stateStack.Peek().OnExit();
        stateStack.Pop();

        if (stateStack.Count > 0)
            stateStack.Peek().OnEnter();
    }

    public void Update()
    {
        if (stateStack.Count > 0)
            stateStack.Peek().OnUpdate();
    }
}
and finally we can push and pop states like so:
// On boot
StateManager.Instance.PushState(new MainMenuState())
// After pressing the start game button
StateManager.Instance.PushState(new GameplayState())
// After the game ends
StateManager.Instance.PopState()
In Unreal:
First off we need to define our individual state objects:
UINTERFACE(MinimalAPI, Blueprintable)
class UStateInterface : public UInterface
{
    GENERATED_BODY()
};

class IStateInterface
{
    GENERATED_BODY()
public:
    virtual void Enter();
    virtual void Exit();
    virtual void Update(float DeltaTime);
};

UCLASS(Blueprintable)
class UMainMenuState : public UObject, public IStateInterface
{
    GENERATED_BODY()
public:
    virtual void Enter() { /*Do stuff*/ }
    virtual void Exit() { /*Do stuff*/ }
    virtual void Update(float DeltaTime) { /*Do stuff*/ }
};

UCLASS(Blueprintable)
class UGameplayState : public UObject, public IStateInterface
{
    GENERATED_BODY()
public:
    virtual void Enter() { /*Do stuff*/ }
    virtual void Exit() { /*Do stuff*/ }
    virtual void Update(float DeltaTime) { /*Do stuff*/ }
};
Then we create a UObject to manage our stack:
UCLASS()
class YOURPROJECT_API UStateStack : public UObject
{
    GENERATED_BODY()

private:
    TArray<IState*> StateStack;

public:
    void PushState(IState* NewState)
    {
        if (StateStack.Num() > 0)
            StateStack.Last()->OnExit();

        StateStack.Add(NewState);
        NewState->OnEnter();
    }

    void PopState()
    {
        if (StateStack.Num() == 0) return;

        StateStack.Last()->OnExit();
        StateStack.RemoveAt(StateStack.Num() - 1);

        if (StateStack.Num() > 0)
        {
            StateStack.Last()->OnEnter();
        }
    }

    void Update(float DeltaTime)
    {
        if (StateStack.Num() > 0){
            StateStack.Last()->OnUpdate(DeltaTime);
        }
    }
};
Finally you can leverage the StateStack anywhere, but for UI you most likely want it on a PlayerController:
UCLASS()
class YOURPROJECT_API AMyPlayerController : public APlayerController
{
    GENERATED_BODY()

private:
    UStateStackManager* StateStackManager;

public:
    AMyPlayerController()
    {
        StateStackManager = NewObject<UStateStackManager>();
    }

    virtual void BeginPlay() override
    {
        Super::BeginPlay();
        StateStackManager->PushState(NewObject<UMainMenuState>());
    }

    virtual void Tick(float DeltaTime) override
    {
        Super::Tick(DeltaTime);
        StateStackManager->Update(DeltaTime);

        // Example: Transition to gameplay
        if (/* condition to start game */)
        {
            StateStackManager->PushState(NewObject<UGameplayState>());
        }
    }
};
I would also recommend checking out Widget Stacks in Epic’s CommonUI Plugin. They can be used very similarly to State Stacks and work very well for UI state with widgets.
Conclusion:
Ultimately, which of the tools laid out here that you find most useful and how you use them will depend on (in order of importance):
- Your game - All games are different and have different needs, patterns that work well in a turn-based game that are a poor fit for an online shooter.
- Your team - Technology serves teams, it doesn’t matter how beautiful your code is if your team-members can’t make use of it.
- Your personal aesthetics - Every programmer has different approaches they like and contrary to popular belief there is no standard for what is “clean code”, there is only code that works, is flexible, and is performant.
Not everything will work for everyone, if you find one of these patterns isn’t working for your game or you have an idea for how to do it differently, don’t be afraid to experiment and go off the beaten path!
You may even find new patterns that you can share with others along the way 😀
Further Reading
- Game Programming Patterns is an excellent book that has even more detail and patterns then I laid out here.
- Game Engine Architexture is more about engine systems, but having a survey of what an engine should offer will help you work in harmony with it rather than against it.
- Design Patterns is the grand-daddy of this topic and highly regarded in the field of computer science (just note that it is rather old and some patterns may not work well with modern game frameworks).